
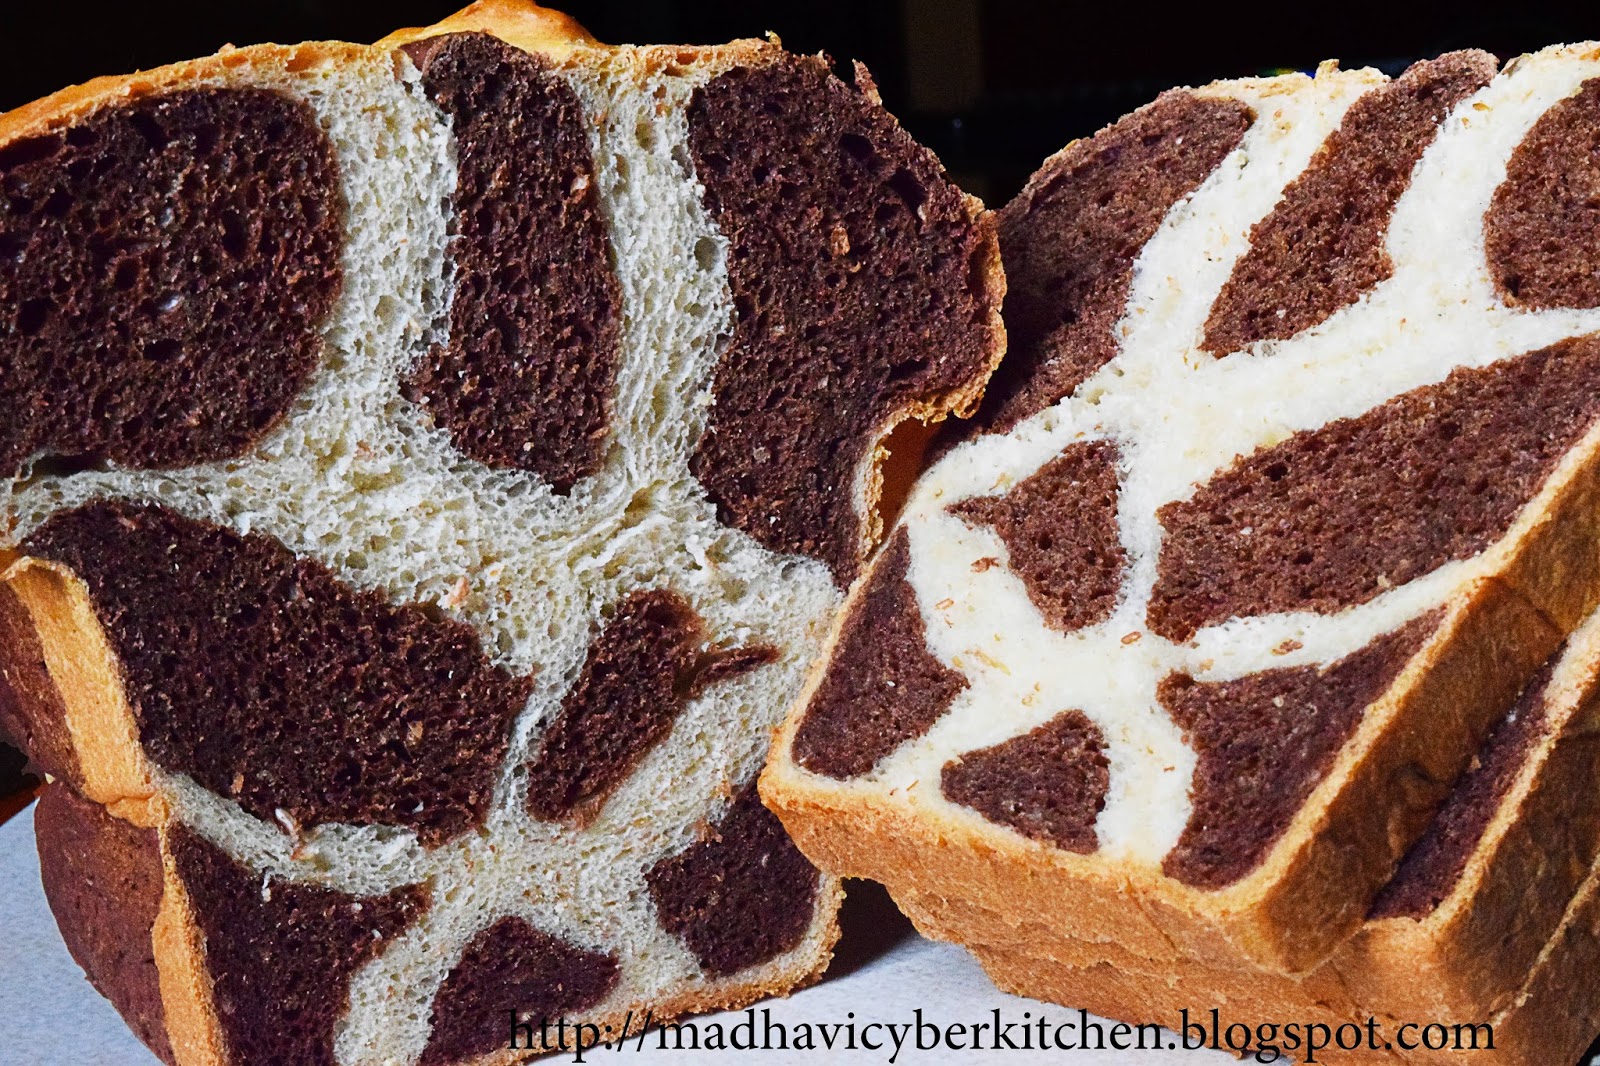
This month challenge at we knead to bake #37 was to create an attractive pattern on the bread. Instead of just baking usual bread, bit of creativity will make the baking more interesting. I wanted to have a Giraffe patch like pattern (very thin white patches on my bread) but, it was not. I know where, I went wrong. My loaf pan is not wide enough to accommodate the dough.
However, it turned out very soft, sponge and good texture bread. The pattern was inspired from here.

Ingredients : 2 cups all purpose flour ; 1 cup whole wheat flour ; 2/3 cup of warm milk ; 1/2 cup of warm water ; 50 gms of butter melted ; 3 tbsp of sugar ; 1 tsp of salt ; 2 tsp of instant yeast. ; 4 to 5 tbsp of coco powder dissolved in 3 tbsp of milk (for the darker brown colored dough) ; little oil ; little milk for brushing
Procedure : combine all of the ingredients (except coco powder) in a large bowl and stir until the dough starts to leave the sides of the bowl. Transfer the dough to a lightly greased surface and knead for about 8 – 10 minutes by hand (if required, oil your hands) or until it become smooth and supple.

With rolling pin roll the dough into circle shape and divide into three equal parts. Take the one part of the dough and place it on the lightly greased bowl and cover with damp cloth and allow it to raise double in volume. (may take about 45 to 60 min)
Take the other two parts of the dough and add the cocoa powder (dissolved in the 3 tbsp of milk) and knead well until to form a uniform colour. (This is the dark coloured dough for the giraffe patches) Shape it into a ball and place it in a lightly greased bowl and cover with damp cloth and allow it to raise double in volume.
Gently deflate the coco dough and then divide into 4 equal portions. With hand roll the dough like rope or sausage shape. You will get 4 same size rope(s) like dough.
Similarly, deflate the white dough and then divide into 4 equal portions. With rolling pin roll the dough into oval shape. You will get the 4 equal oval shapes. Try to make similar length of the coco dough and the width is just enough to cover the coco dough.
Now, place the rope shaped coco dough on the mid of oval shaped white dough and cover the coco dough. i.e enclose the rope shaped coco dough by the white dough and seal the end of the white dough. Gently roll on the dusted work surface to form a rope (like our house hold electrical wire, the inner copper conductor is surrounded or enclosed by a plastic insulator. Just imagine, the coco dough is the copper wire and the plastic insulator is the white dough)
Now, you should have 4 similar length and width rope shaped dough. Just by dividing into two equal half’s (the length depends on your loaf tin) you will get eight pieces of dough roll.
Arrange the dough rolls in the greased loaf tin by placing 3 rolls at the bottom. two rolls over the 3 forms the middle layer and 3 more rolls on the 2 forms the top layer. Cover the loaf tin by damp cloth for the second rise, for about 45 minutes. Brush the dough with milk.

Transfer the loaf tin into a 180°C preheated oven for about 30 minutes or until its light golden brown and done. Allow to cool it on a rack before slicing. Store the bread in a plastic bag at room temperature for several days; freeze for longer storage.